Difference between revisions of "Deploying a Self-signed SSL Certificate"
| [unchecked revision] | [checked revision] |
Ltalaschus (talk | contribs) |
|||
| (12 intermediate revisions by 2 users not shown) | |||
| Line 1: | Line 1: | ||
__NOTOC__ | __NOTOC__ | ||
| + | |||
| + | <p class="mswarning">'''Important notice:''' This article describes a no longer recommended scenario to use self-signed certificates in a production environment. Thus it is going to be removed mid-term.<br/><br/>Please follow the instructions at [[Using Your Own SSL Certificate]], to learn more about how to replace the self-signed certificate created during installation with a trusted certificate signed by an external certificate authority.</p> | ||
== Background == | == Background == | ||
| − | During the installation of MailStore Server | + | During the installation of MailStore Server an SSL certificate is generated which is used by all MailStore components for encrypted connections. Because the certificate is issued with a server name ''MailStoreServer'' and does not originate from a trusted certification authority (CA), it is not trusted by the client side. |
[[File:MScert.png|350px|center]] | [[File:MScert.png|350px|center]] | ||
| − | Because of this, the following warning message appears when calling up MailStore Web Access via HTTPS (SSL) or when using the Outlook Add-In with the | + | Because of this, the following warning message appears when calling up MailStore Web Access via HTTPS (SSL) or when using the Outlook Add-In with the ''secure connection'' setting activated: |
[[File:MSnotrust.png|550px|center]] | [[File:MSnotrust.png|550px|center]] | ||
| − | |||
| − | |||
| − | To configure MailStore Server and your clients for using a self-signed certificate, please proceed as | + | When using a self-signed certificate, the following requirements must be fulfilled so the client does not get a certificate warning. |
| + | |||
| + | * The hostname of the MailStore Server computer must be in in the ''Subject'' or ''Subject Alternative Name'' field of the certificate. In case of Firefox and Chrome the ''Subject Alternative Name'' fields are mandatory. | ||
| + | * The client must use one of these names when connecting to MailStore Server. | ||
| + | * The issuer of the certificate must be trusted. | ||
| + | * The certificate must not be expired. | ||
| + | |||
| + | This article describes the option to deploy self-signed certificates using a group policy. An alternative is to use officially signed SSL certificates issued by your own company CA or a trusted external certificate authority, such as VeriSign or eTrust. This is described in chapter [[Using Your Own SSL Certificate]]. | ||
| + | |||
| + | To configure MailStore Server and your clients for using a self-signed certificate, please proceed as follows: | ||
| + | |||
| + | == Preparing a Self-Signed Certificate == | ||
| + | |||
| + | === Alternative 1: Using the automatically generated certificate === | ||
| − | + | The certificate created during the installation is issued to ''MailStoreServer''. | |
| − | + | Therefore an A- or CNAME-record ''MailStoreServer'' must be present on the DNS server that can be used to reach the MailStore Server computer. | |
| − | + | This certificate cannot be used, if you need compatibility with Firefox and Chrome. | |
| − | === Alternative | + | === Alternative 2: Create a certificate by using the MailStore Server Service Configuration === |
| − | This alternative should be preferred | + | This alternative should be preferred when you want to use a new certificate with default parameters. These parameters are basically: |
* The ''Subject'' field is user defined. This equates to the hostname of the MailStore Server computer. | * The ''Subject'' field is user defined. This equates to the hostname of the MailStore Server computer. | ||
| − | * The certificate is valid | + | * The certificate is valid for 20 years. |
| − | * The signature algorithm is | + | * The signature algorithm is SHA256. |
| − | * ''Subject Alternative | + | * ''Subject Alternative Name'' fields are not set. |
* The ''FriendlyName'' value is not set. | * The ''FriendlyName'' value is not set. | ||
| − | To create the certificate proceed as follows: | + | Since ''Subject Alternative Name'' fields are not set, this certificate cannot be used with Firefox and Chrome. |
| + | |||
| + | To create the certificate, proceed as follows: | ||
* Open the MailStore Server Service Configuration. | * Open the MailStore Server Service Configuration. | ||
| Line 37: | Line 52: | ||
* Click on the button next to the field ''Server Certificate'' and select ''Create Self-Signed Certificate...'' | * Click on the button next to the field ''Server Certificate'' and select ''Create Self-Signed Certificate...'' | ||
*: [[File:Deploy_selfsigned_00.png|center|550px]] | *: [[File:Deploy_selfsigned_00.png|center|550px]] | ||
| − | * As name for the new certificate | + | * As name for the new certificate enter the server name of the MailStore Server machine, e.g. mailstore.mydomain.local, and click on ''OK''. |
* If necessary, replace all additional server certificates with the new certificate. To do so, click on the button next to the ''Server Certificate'' field and select ''Select from Certificate Store...'' | * If necessary, replace all additional server certificates with the new certificate. To do so, click on the button next to the ''Server Certificate'' field and select ''Select from Certificate Store...'' | ||
| − | === Alternative | + | === Alternative 3: Create a certificate by using certreq === |
| − | This alternative should be preferred | + | This alternative should be preferred if the certificate has to conform to requirements that cannot be fulfilled with the default parameters. For example, if you have to use ''Subject Alternative Names'' or if you want a limited validity period. |
* Log on to the MailStore Server computer. | * Log on to the MailStore Server computer. | ||
| Line 54: | Line 69: | ||
; replace Subject attributes in the line below with real values | ; replace Subject attributes in the line below with real values | ||
Subject = "CN=mailstoreserver.example.com, OU=Department, O=Organisation, L=Locality, S=State, C=Country" | Subject = "CN=mailstoreserver.example.com, OU=Department, O=Organisation, L=Locality, S=State, C=Country" | ||
| − | HashAlgorithm = | + | HashAlgorithm = sha256 |
KeySpec = 1 | KeySpec = 1 | ||
KeyLength = 2048 | KeyLength = 2048 | ||
| Line 68: | Line 83: | ||
RequestType = Cert | RequestType = Cert | ||
KeyUsage = 0xa0 | KeyUsage = 0xa0 | ||
| − | + | ValidityPeriodUnits = 20 | |
| − | + | ValidityPeriod = Years | |
[EnhancedKeyUsageExtension] | [EnhancedKeyUsageExtension] | ||
OID = 1.3.6.1.5.5.7.3.1 ; this is for Server Authentication | OID = 1.3.6.1.5.5.7.3.1 ; this is for Server Authentication | ||
| + | |||
| + | [Extensions] | ||
| + | 2.5.29.17 = "{text}" | ||
| + | _continue_ = "DNS=mailstoreserver.example.com&" | ||
| + | _continue_ = "DNS=mailstoreserver&" | ||
| + | _continue_ = "DNS=172.31.1.5&" | ||
| + | _continue_ = "IPADDRESS=172.31.1.5&" | ||
</pre> | </pre> | ||
| − | * Adjust ''Subject'', ''FriendlyName'', '' | + | * Adjust ''Subject'', ''FriendlyName'', ''ValidityPeriodUnits'', ''ValidityPeriod'' according to your needs. |
| + | * Add or remove ''_continue_'' lines in the ''Extensions'' section and adjust them according to your needs. All valid host names must appear in the ''Extensions'' section. | ||
* Save the file. | * Save the file. | ||
* Open an elevated command prompt and navigate to the directory where the ''request.inf'' is stored. | * Open an elevated command prompt and navigate to the directory where the ''request.inf'' is stored. | ||
| Line 80: | Line 103: | ||
certreq -new request.inf request.csr | certreq -new request.inf request.csr | ||
* Open the MailStore Server Service Configuration. | * Open the MailStore Server Service Configuration. | ||
| − | * Click on ''IP- | + | * Click on ''IP-Adresses and Ports''. |
* Click on the button next to the field ''Server Certificate'' (…) and select ''Select from Certificate Store...'' | * Click on the button next to the field ''Server Certificate'' (…) and select ''Select from Certificate Store...'' | ||
* Select the previously created certificate and press ''OK''. | * Select the previously created certificate and press ''OK''. | ||
* Replace the other certificates by clicking on the button next to the field ''Server Certificate'' (…) and select ''Select from Certificate Store...'' | * Replace the other certificates by clicking on the button next to the field ''Server Certificate'' (…) and select ''Select from Certificate Store...'' | ||
| − | |||
| − | |||
| − | |||
| − | |||
| − | |||
| − | |||
| − | |||
| − | |||
| − | |||
| − | |||
| − | |||
| − | |||
| − | |||
== Deploying a Self-Signed Certificate == | == Deploying a Self-Signed Certificate == | ||
| − | Before the self-signed certificate can be deployed | + | Before the self-signed certificate can be deployed it must be exported from the current certificate store. Please proceed as follows: |
* Open the MailStore Server Service Configuration. | * Open the MailStore Server Service Configuration. | ||
| − | * Click on ''IP- | + | * Click on ''IP-Adresses and Ports''. |
* Click on the certificate. | * Click on the certificate. | ||
* Open the ''Details'' tab. | * Open the ''Details'' tab. | ||
* Click on ''Copy to File''. | * Click on ''Copy to File''. | ||
| − | * Follow the instructions of the certificate export wizard to export the certificate ''without'' the private key in DER encoded format into a file. | + | * Follow the instructions of the certificate export wizard to export the certificate '''without''' the private key in DER encoded format into a file. |
| − | Once the certificate has been exported to a file, create a group policy as described in chapters [[MailStore Client Deployment]] or [[MailStore Outlook Add-in Deployment]] | + | Once the certificate has been exported to a file, create a group policy as described in chapters [[MailStore Client Deployment]] or [[MailStore Outlook Add-in Deployment]]. To deploy the certificate customize the GPO as follows: |
* Open the group policy object using the ''Group Policy Management Editor'' of your Windows server. | * Open the group policy object using the ''Group Policy Management Editor'' of your Windows server. | ||
* Expand the ''Computer Configuration'' > ''Policies'' > ''Windows Settings'' > ''Security Settings'' > ''Public Key Policies''. | * Expand the ''Computer Configuration'' > ''Policies'' > ''Windows Settings'' > ''Security Settings'' > ''Public Key Policies''. | ||
| − | * Right-click on ''Trusted Root Certification Authorities'' and select ''Import...'' | + | * Right-click on ''Trusted Root Certification Authorities'' and select ''Import...'' |
* Follow the instructions of the certificate import wizard to import the certificate from the file. | * Follow the instructions of the certificate import wizard to import the certificate from the file. | ||
| − | * Under ''Public Key Policies'' open the properties of the ''Certificate Services Client - Auto-Enrollment'' | + | * Under ''Public Key Policies'' open the properties of the ''Certificate Services Client - Auto-Enrollment''. |
*: [[File:Deploy_selfsigned_01.png|center|550px]] | *: [[File:Deploy_selfsigned_01.png|center|550px]] | ||
* Change the ''Configuration Model'' to ''Enabled'' and click on ''OK''. | * Change the ''Configuration Model'' to ''Enabled'' and click on ''OK''. | ||
| Line 122: | Line 132: | ||
* Place a checkmark next to ''Define these policy settings'' and click ''OK''. | * Place a checkmark next to ''Define these policy settings'' and click ''OK''. | ||
| − | The group policy will be enabled once the workstation is restarted. | + | The group policy will be enabled once the workstation is restarted, the Group Policy refresh interval is hit or a Group Policy update is triggered manually. |
| + | |||
| + | == Adding Firefox compatibility == | ||
| + | |||
| + | Firefox has its own certificate management and does not use the windows certificate store by default. Since Firefox 52 you are able to tell Firefox to use the windows certificate store as well. | ||
| + | |||
| + | * Open Firefox and enter ''about:config'' in the address bar. | ||
| + | * Confirm the security warning, if any. | ||
| + | * Search for ''security.enterprise_roots.enabled'' and set its value to ''true''. In case the setting does not exist yet, create it as a ''boolean''. | ||
| + | * Restart Firefox. | ||
| + | |||
| + | These steps have to be performed manually on every workstation. | ||
| + | == Weblinks == | ||
| + | * [https://technet.microsoft.com/en-us/library/dn296456.aspx Microsoft Technet: Certreq] | ||
| + | * [https://technet.microsoft.com/de-de/library/ff625722.aspx Microsoft Technet: How to Request a Certificate With a Custom Subject Alternative Name] | ||
| + | * [https://wiki.mozilla.org/CA:AddRootToFirefox Mozilla AddRootToFirefox] | ||
| − | [[de: | + | [[de:Verteilung eines selbstsignierten SSL-Zertifikats]] |
| + | [[en:Deploying_a_Self-signed_SSL_Certificate]] | ||
Latest revision as of 15:41, 16 January 2018
Important notice: This article describes a no longer recommended scenario to use self-signed certificates in a production environment. Thus it is going to be removed mid-term.
Please follow the instructions at Using Your Own SSL Certificate, to learn more about how to replace the self-signed certificate created during installation with a trusted certificate signed by an external certificate authority.
Background
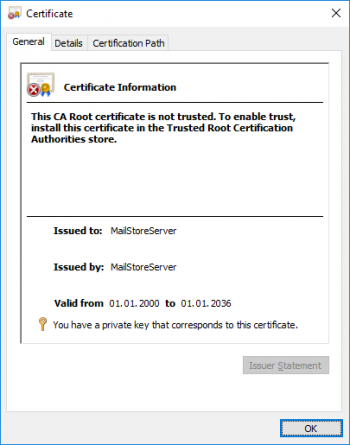
During the installation of MailStore Server an SSL certificate is generated which is used by all MailStore components for encrypted connections. Because the certificate is issued with a server name MailStoreServer and does not originate from a trusted certification authority (CA), it is not trusted by the client side.
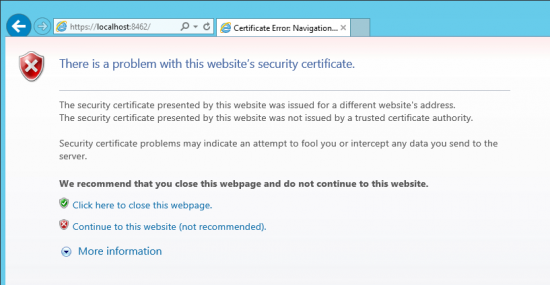
Because of this, the following warning message appears when calling up MailStore Web Access via HTTPS (SSL) or when using the Outlook Add-In with the secure connection setting activated:
When using a self-signed certificate, the following requirements must be fulfilled so the client does not get a certificate warning.
- The hostname of the MailStore Server computer must be in in the Subject or Subject Alternative Name field of the certificate. In case of Firefox and Chrome the Subject Alternative Name fields are mandatory.
- The client must use one of these names when connecting to MailStore Server.
- The issuer of the certificate must be trusted.
- The certificate must not be expired.
This article describes the option to deploy self-signed certificates using a group policy. An alternative is to use officially signed SSL certificates issued by your own company CA or a trusted external certificate authority, such as VeriSign or eTrust. This is described in chapter Using Your Own SSL Certificate.
To configure MailStore Server and your clients for using a self-signed certificate, please proceed as follows:
Preparing a Self-Signed Certificate
Alternative 1: Using the automatically generated certificate
The certificate created during the installation is issued to MailStoreServer.
Therefore an A- or CNAME-record MailStoreServer must be present on the DNS server that can be used to reach the MailStore Server computer.
This certificate cannot be used, if you need compatibility with Firefox and Chrome.
Alternative 2: Create a certificate by using the MailStore Server Service Configuration
This alternative should be preferred when you want to use a new certificate with default parameters. These parameters are basically:
- The Subject field is user defined. This equates to the hostname of the MailStore Server computer.
- The certificate is valid for 20 years.
- The signature algorithm is SHA256.
- Subject Alternative Name fields are not set.
- The FriendlyName value is not set.
Since Subject Alternative Name fields are not set, this certificate cannot be used with Firefox and Chrome.
To create the certificate, proceed as follows:
- Open the MailStore Server Service Configuration.
- Click on IP Addresses and Ports.
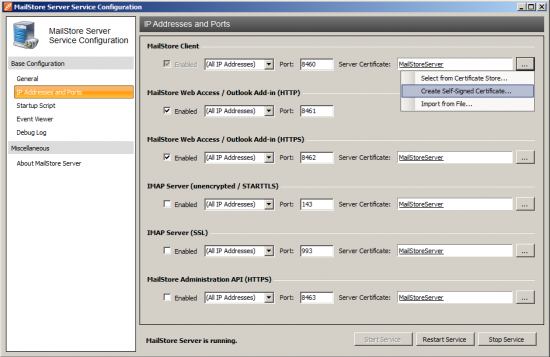
- Click on the button next to the field Server Certificate and select Create Self-Signed Certificate...
- As name for the new certificate enter the server name of the MailStore Server machine, e.g. mailstore.mydomain.local, and click on OK.
- If necessary, replace all additional server certificates with the new certificate. To do so, click on the button next to the Server Certificate field and select Select from Certificate Store...
Alternative 3: Create a certificate by using certreq
This alternative should be preferred if the certificate has to conform to requirements that cannot be fulfilled with the default parameters. For example, if you have to use Subject Alternative Names or if you want a limited validity period.
- Log on to the MailStore Server computer.
- Prepare a text file request.inf with the following content:
;----------------- request.inf -----------------
[Version]
Signature="$Windows NT$"

[NewRequest]
; replace Subject attributes in the line below with real values
Subject = "CN=mailstoreserver.example.com, OU=Department, O=Organisation, L=Locality, S=State, C=Country"
HashAlgorithm = sha256
KeySpec = 1
KeyLength = 2048
Exportable = TRUE
FriendlyName = mailstoreserver.example.com
MachineKeySet = TRUE
SMIME = False
PrivateKeyArchive = FALSE
UserProtected = FALSE
UseExistingKeySet = FALSE
ProviderName = "Microsoft RSA SChannel Cryptographic Provider"
ProviderType = 12
RequestType = Cert
KeyUsage = 0xa0
ValidityPeriodUnits = 20
ValidityPeriod = Years

[EnhancedKeyUsageExtension]
OID = 1.3.6.1.5.5.7.3.1 ; this is for Server Authentication

[Extensions]
2.5.29.17 = "{text}"
_continue_ = "DNS=mailstoreserver.example.com&"
_continue_ = "DNS=mailstoreserver&"
_continue_ = "DNS=172.31.1.5&"
_continue_ = "IPADDRESS=172.31.1.5&"
- Adjust Subject, FriendlyName, ValidityPeriodUnits, ValidityPeriod according to your needs.
- Add or remove _continue_ lines in the Extensions section and adjust them according to your needs. All valid host names must appear in the Extensions section.
- Save the file.
- Open an elevated command prompt and navigate to the directory where the request.inf is stored.
- Create the certificate by executing the following command:
certreq -new request.inf request.csr
- Open the MailStore Server Service Configuration.
- Click on IP-Adresses and Ports.
- Click on the button next to the field Server Certificate (…) and select Select from Certificate Store...
- Select the previously created certificate and press OK.
- Replace the other certificates by clicking on the button next to the field Server Certificate (…) and select Select from Certificate Store...
Deploying a Self-Signed Certificate
Before the self-signed certificate can be deployed it must be exported from the current certificate store. Please proceed as follows:
- Open the MailStore Server Service Configuration.
- Click on IP-Adresses and Ports.
- Click on the certificate.
- Open the Details tab.
- Click on Copy to File.
- Follow the instructions of the certificate export wizard to export the certificate without the private key in DER encoded format into a file.
Once the certificate has been exported to a file, create a group policy as described in chapters MailStore Client Deployment or MailStore Outlook Add-in Deployment. To deploy the certificate customize the GPO as follows:
- Open the group policy object using the Group Policy Management Editor of your Windows server.
- Expand the Computer Configuration > Policies > Windows Settings > Security Settings > Public Key Policies.
- Right-click on Trusted Root Certification Authorities and select Import...
- Follow the instructions of the certificate import wizard to import the certificate from the file.
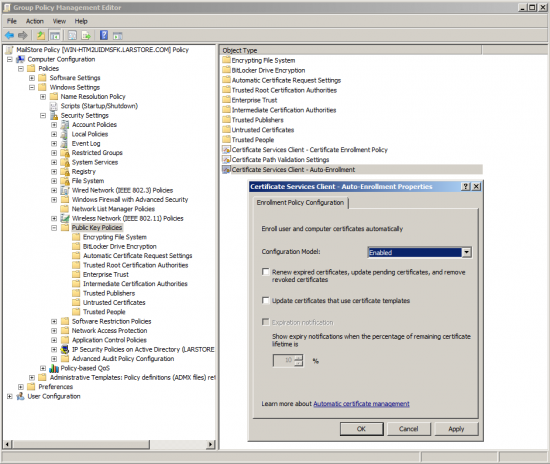
- Under Public Key Policies open the properties of the Certificate Services Client - Auto-Enrollment.
- Change the Configuration Model to Enabled and click on OK.
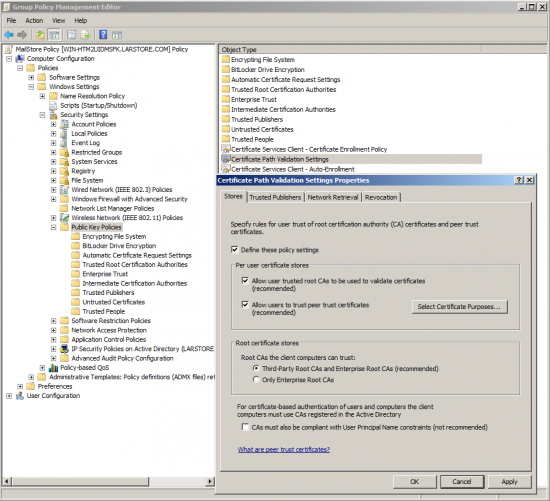
- Under Public Key Policies open the properties of the Certificate Path Validation Settings.
- Place a checkmark next to Define these policy settings and click OK.
The group policy will be enabled once the workstation is restarted, the Group Policy refresh interval is hit or a Group Policy update is triggered manually.
Adding Firefox compatibility
Firefox has its own certificate management and does not use the windows certificate store by default. Since Firefox 52 you are able to tell Firefox to use the windows certificate store as well.
- Open Firefox and enter about:config in the address bar.
- Confirm the security warning, if any.
- Search for security.enterprise_roots.enabled and set its value to true. In case the setting does not exist yet, create it as a boolean.
- Restart Firefox.
These steps have to be performed manually on every workstation.
