Difference between revisions of "Deploying a Self-signed SSL Certificate"
| [unchecked revision] | [unchecked revision] |
m (→Background) |
|||
| Line 17: | Line 17: | ||
The self-signed certificate created during the installation of MailStore Server is issued by the server name ''MailStoreServer''. | The self-signed certificate created during the installation of MailStore Server is issued by the server name ''MailStoreServer''. | ||
| − | If the DNS host name of the server does not correspond to ''MailStoreServer'' and if no corresponding A- or CNAME record exists | + | If the DNS host name of the server does not correspond to ''MailStoreServer'' and if no corresponding A- or CNAME record exists on the DNS server, first a new self-signed certificate with the appropriate host name must be created. Please proceed as follows: |
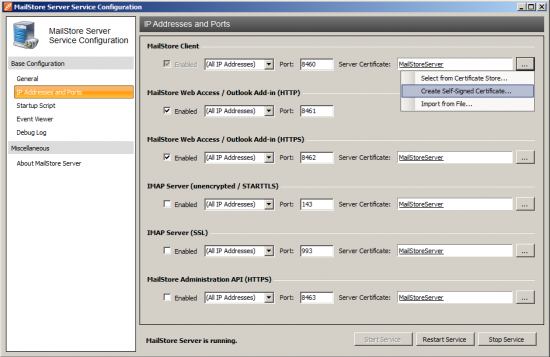
* Open the MailStore Server Service Configuration. | * Open the MailStore Server Service Configuration. | ||
* Click on ''IP Addresses and Ports''. | * Click on ''IP Addresses and Ports''. | ||
| − | * Click on the button next to the field ''Server Certificate'' and select ''Create | + | * Click on the button next to the field ''Server Certificate'' and select ''Create Self-Signed Certificate...'' |
*: [[File:Deploy_selfsigned_00.png|center|550px]] | *: [[File:Deploy_selfsigned_00.png|center|550px]] | ||
* As name for the new certificate, enter the server name at which the MailStore server can be reached, e.g. mailstore.mydomain.local, and click on ''OK''. | * As name for the new certificate, enter the server name at which the MailStore server can be reached, e.g. mailstore.mydomain.local, and click on ''OK''. | ||
| − | * If necessary, replace all additional server certificates with the new certificate. To do so, click on the button next to the ''Server Certificate'' field and select '' | + | * If necessary, replace all additional server certificates with the new certificate. To do so, click on the button next to the ''Server Certificate'' field and select ''Select from Certificate Store...'' |
== Verteilen des selbstsigniertes Zertifikats == | == Verteilen des selbstsigniertes Zertifikats == | ||
Revision as of 15:27, 22 June 2012
Background
During the installation of MailStore Server, an SSL certificate is generated which is used by all MailStore components if an encrypted connection is to be established. Because the certificate is issued to the server name MailStoreServer and does not originate from a trusted certification authority (CA), is not trusted by the client side.
Because of this, the following warning message appears when calling up MailStore Web Access via HTTPS (SSL):
This article describes the option to deploy self-signed certificates using a group policy. An alternative is to use officially signed SSL certificates issued by your own company CA or a public certificate provider, such as VeriSign or eTrust, which is described in chapter Using Your Own SSL Certificate.
To configure MailStore Server and your clients for using a self-signed certificate, please proceed as described in the following.
Creating a Self-Signed Certificate
The self-signed certificate created during the installation of MailStore Server is issued by the server name MailStoreServer.
If the DNS host name of the server does not correspond to MailStoreServer and if no corresponding A- or CNAME record exists on the DNS server, first a new self-signed certificate with the appropriate host name must be created. Please proceed as follows:
- Open the MailStore Server Service Configuration.
- Click on IP Addresses and Ports.
- Click on the button next to the field Server Certificate and select Create Self-Signed Certificate...
- As name for the new certificate, enter the server name at which the MailStore server can be reached, e.g. mailstore.mydomain.local, and click on OK.
- If necessary, replace all additional server certificates with the new certificate. To do so, click on the button next to the Server Certificate field and select Select from Certificate Store...
Verteilen des selbstsigniertes Zertifikats
Bevor das selbstsignierte Zertifikat verteilt werden kann, muss es wie im Folgenden beschrieben, aus dem bisherigen Zertifikatspeicher exportiert werden:
- Öffnen Sie die MailStore Server Dienst-Konfiguration.
- Klicken Sie auf IP-Adressen und Ports.
- Klicken Sie auf das Zertifikat.
- Öffnen Sie die Registerkarte Details.
- Klicken Sie nun auf In Datei kopieren.
- Folgen Sie den Anweisungen des Zertifikatexports-Assistenten um das Zertifikat ohne den privaten Schlüssel im DER-codierten Format in einer Datei zu exportieren.
Nachdem Sie das Zertifikat erfolgreich in eine Datei exportiert haben, erstellen Sie wie unter MailStore Client Deployment bzw. MailStore Outlook Add-In Deployment beschrieben eine Gruppenrichtlinie und passen Sie diese zum Verteilen des Zertifikats wie folgt an:
- Öffnen Sie das Gruppenrichtlinienobjekt mit Hilfe der Gruppenrichtlinien-Verwaltungskonsole Ihres Windows-Servers.
- Öffnen Sie den Zweig Computerkonfiguration > Richtlinien > Windows-Einstellungen > Sicherheitseinstellungen > Richtlinie für öffentliche Schlüssel.
- Klicken Sie mit der rechten Maustaste auf Vertrauenswürdige Stammzertifizierungsstellen und wählen Sie Importieren....
- Folgen Sie den Anweisungen des Zertifikatimport-Assistenten um das Zertifikat aus der Datei zu importieren.
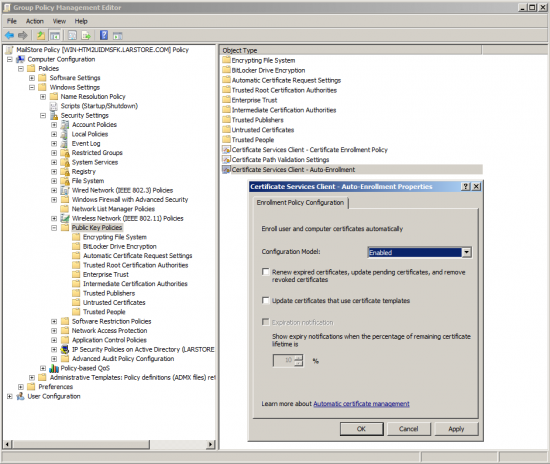
- Öffnen Sie unter Richtlinie für öffentliche Schlüssel die Eigenschaften des Zertifikatdienstclient - Automatische Registrierung
- Ändern Sie das Konfigurationsmodell auf Aktiviert und klicken Sie auf OK.
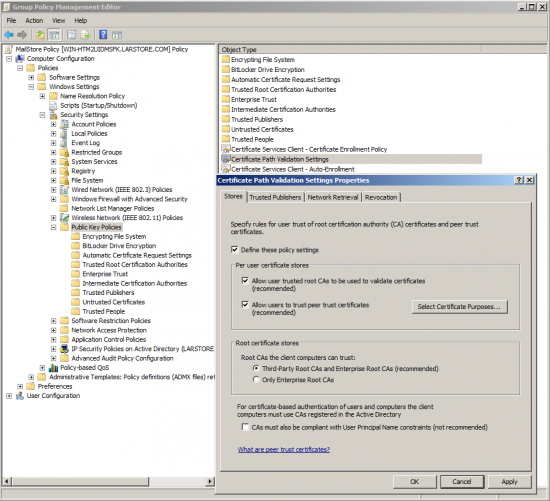
- Öffnen Sie unter Richtlinie für öffentliche Schlüssel die Eigenschaften der Einstellungen für die Überprüfung des Zertifikatpfades
- Setzen Sie das Häkchen bei Diese Richtlinieneinstellungen definieren und klicken und klicken Sie auf OK.
Die Gruppenrichtlinie wird beim nächsten Starten der Arbeitsstationen aktiv.


